Showing posts with label Android. Show all posts

Wednesday, November 14, 2018

Flutter: Installation and setup

Flutter is an open source framework (developed by Google) for building native mobile apps for Android and iOS using DART language. React Native (open source framework for building native mobile app for android and iOS using JS/TS language) is developed by Facebook.

Installation(for Windows):


1. Git
2. Powershell (Installed with Windows)
3. Java JDK
4. Android Studio (with AVD)
5. Visual Studio Code 
5. Flutter

Install the above softwares by clicking the link.

Run the  (flutter_console.bat) under flutter directory and run the below command which tells list of softwares required is been installed or not.

Android Studio Installation Error (Installer integrity check has failed): 
if you receive the error (Installer integrity check has failed) while installing the android studio using exe file, try to download RAR file and install.
Or
open the command prompt, run the exe file with switch like below.

C:\Users\ayyanar.jayabalan\Downloads\android-studio-ide-181.5056338-windows.exe /NCRC


flutter doctor

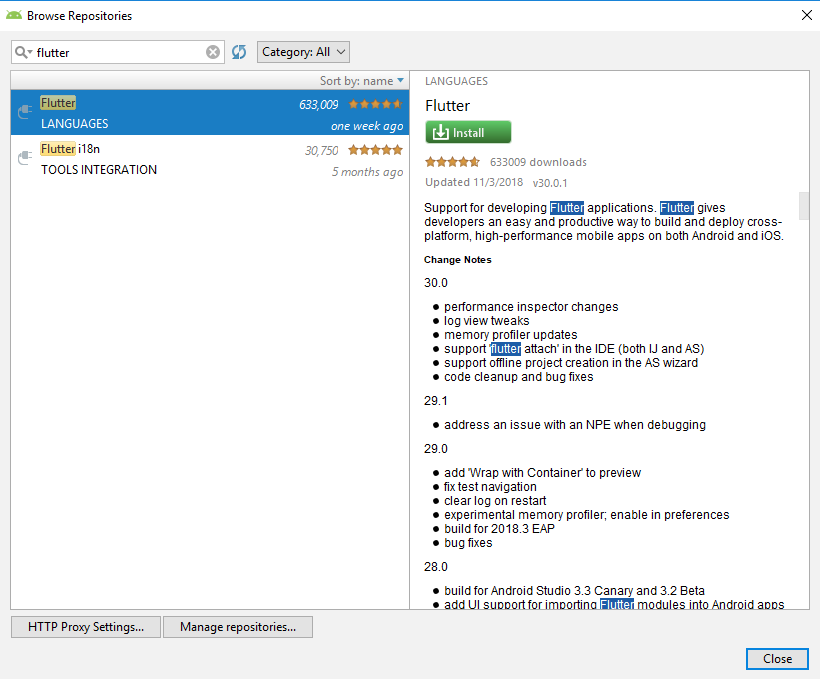
After installing the android studio, install flutter and dart plugin.


flutter doctor
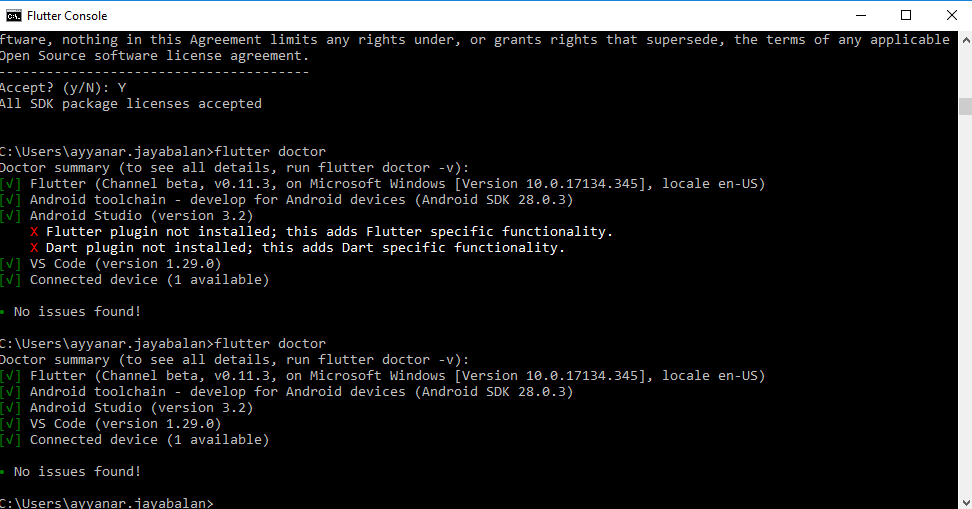


Now you have installed all required softwares to start to work flutter.


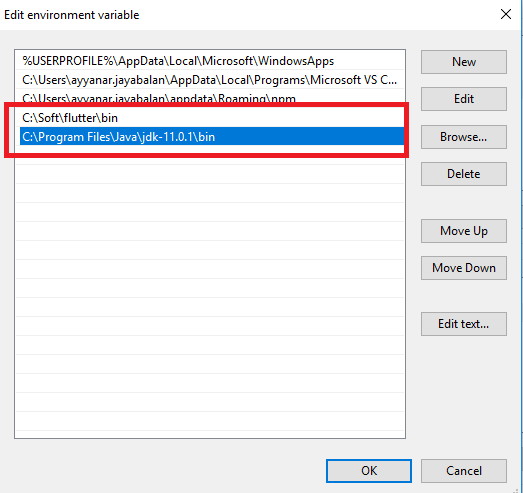
Setup:

1. Setting up the JDK Path in environment variables.

2. Setting up the Flutter Path in environment variables.


Sunday, November 04, 2012

How to open Google Map with locating address in Android

In this post, I am going to explain how google map with locating address in Android. Just three lines of code is enough to make this happen. Before run the application, make sure that you have selected Google Map API in AVD Manager configuration.


 String address = "Jawaharlal Nehru Rd Kasi Estate Jafferkhanpet Chennai Tamil Nadu";   
 Intent intent = new Intent(Intent.ACTION_VIEW, Uri.parse("geo:0,0?q=" + address));  
 context.startActivity(intent);  


 Here is the complete code.

Layout File:


 <RelativeLayout xmlns:android="http://schemas.android.com/apk/res/android"  
   xmlns:tools="http://schemas.android.com/tools"  
   android:layout_width="match_parent"  
   android:layout_height="match_parent" >  
   <Button  
     android:id="@+id/btnGoogleMap"  
     android:layout_width="wrap_content"  
     android:layout_height="wrap_content"  
     android:layout_centerHorizontal="true"  
     android:layout_marginTop="30dp"  
     android:text="Google Map" />  
 </RelativeLayout>  


Activity Class:


 import android.net.Uri;  
 import android.os.Bundle;  
 import android.app.Activity;  
 import android.content.Context;  
 import android.content.Intent;  
 import android.view.Menu;  
 import android.view.View;  
 import android.view.View.OnClickListener;  
 import android.widget.Button;  
 public class GoogleMapActivity extends Activity {  
      final Context context = this;  
      Button btnGoogleMap;  
   @Override  
   public void onCreate(Bundle savedInstanceState) {  
     super.onCreate(savedInstanceState);  
     setContentView(R.layout.google_map);  
     btnGoogleMap.setOnClickListener(new OnClickListener() {  
             public void onClick(View v) {  
                  String address = "Jawaharlal Nehru Rd Kasi Estate Jafferkhanpet Chennai Tamil Nadu";   
                  Intent intent = new Intent(Intent.ACTION_VIEW, Uri.parse("geo:0,0?q=" + address));  
                  context.startActivity(intent);  
              }  
             }  
        );  
   }  
   @Override  
   public boolean onCreateOptionsMenu(Menu menu) {  
     getMenuInflater().inflate(R.menu.google_map, menu);  
     return true;  
   }  
 }  


Manifest File:


 <manifest xmlns:android="http://schemas.android.com/apk/res/android"  
   package="com.ayyanar.helloworld"  
   android:versionCode="1"  
   android:versionName="1.0" >  
   <uses-sdk  
     android:minSdkVersion="8"  
     android:targetSdkVersion="15" />  
   <uses-permission android:name="android.permission.INTERNET" />  
   <application  
     android:icon="@drawable/ic_launcher"  
     android:label="@string/app_name"  
     android:theme="@style/AppTheme" >  
      <activity  
       android:name=".GoogleMapActivity"  
       android:label="@string/title_activity_google_map" >  
       <intent-filter>  
         <action android:name="android.intent.action.MAIN" />  
         <category android:name="android.intent.category.LAUNCHER" />  
       </intent-filter>  
     </activity>  
   </application>  
 </manifest>  


Screenshots:


How to load web site in native Android application using WebView control

In this post, I am going to explain how to load website in native android web application using webview control. Just three lines of code is enough to make it happen.

Just use the below code to load the website either during oncreate event or button click event.

 webView = (WebView) findViewById(R.id.webView1);  
 webView.getSettings().setJavaScriptEnabled(true);  
 webView.loadUrl("http://ayyanar.blogspot.com");  


And also, you have to set INTERNET PERMISSION in manifest file like below.

  <uses-permission android:name="android.permission.INTERNET" />  


Here is the complete code to do this.

Layout File:

 <RelativeLayout xmlns:android="http://schemas.android.com/apk/res/android"  
   xmlns:tools="http://schemas.android.com/tools"  
   android:layout_width="match_parent"  
   android:layout_height="match_parent" >  
   <TextView  
     android:id="@+id/textView1"  
     android:layout_width="wrap_content"  
     android:layout_height="wrap_content"  
     android:layout_centerHorizontal="true"  
     android:layout_centerVertical="true"  
     android:padding="@dimen/padding_medium"  
     android:text="@string/hello_world"  
     tools:context=".WebViewActivity" />  
   <WebView  
     android:id="@+id/webView1"  
     android:layout_width="match_parent"  
     android:layout_height="match_parent"  
     android:layout_alignParentBottom="true"  
     android:layout_alignParentRight="true" />  
 </RelativeLayout>  


Activity Class:

 
 import android.os.Bundle;  
 import android.app.Activity;  
 import android.view.Menu;  
 import android.webkit.WebView;  
 public class WebViewActivity extends Activity {  
      WebView webView;  
   @Override  
   public void onCreate(Bundle savedInstanceState) {  
     super.onCreate(savedInstanceState);  
     setContentView(R.layout.web_view);  
     webView = (WebView) findViewById(R.id.webView1);  
           webView.getSettings().setJavaScriptEnabled(true);  
           webView.loadUrl("http://ayyanar.blogspot.com");  
   }  
   @Override  
   public boolean onCreateOptionsMenu(Menu menu) {  
     getMenuInflater().inflate(R.menu.web_view, menu);  
     return true;  
   }  
 }  


Manifest File:

 <manifest xmlns:android="http://schemas.android.com/apk/res/android"  
   package="com.ayyanar.helloworld"  
   android:versionCode="1"  
   android:versionName="1.0" >  
   <uses-sdk  
     android:minSdkVersion="8"  
     android:targetSdkVersion="15" />  
   <uses-permission android:name="android.permission.INTERNET" />  
   <application  
     android:icon="@drawable/ic_launcher"  
     android:label="@string/app_name"  
     android:theme="@style/AppTheme" >  
     <activity  
       android:name=".WebViewActivity"  
       android:label="@string/title_activity_web_view" >  
       <intent-filter>  
         <action android:name="android.intent.action.MAIN" />  
         <category android:name="android.intent.category.LAUNCHER" />  
       </intent-filter>  
     </activity>  
   </application>  
 </manifest>  


 Screenshot:


How to create alert dialog box in Android

In this post, I am going to explain about how to create alert dialog in android application. In dialog box interface, you can set the text for title, Yes & No button. And also, you can define the action for each button events.

Please use the below code to create alert dialog in button click event.

 btnAlertDialog.setOnClickListener(new OnClickListener() {  
             public void onClick(View v) {  
                     AlertDialog.Builder alertDialogBuilder = new AlertDialog.Builder(context);  
                     // Title of Alert Dialog  
                     alertDialogBuilder.setTitle("Your Title");  
                     // Building alert dialog  
                     alertDialogBuilder  
                          .setMessage("Welcome Ayyanar!.")  
                          .setCancelable(false)   
                          .setPositiveButton("Yes",new DialogInterface.OnClickListener() {  
                          public void onClick(DialogInterface dialog,int id) {  
                                    txtAlertText.setText("OK Thanks!");  
                               }  
                           })  
                          .setNegativeButton("No",new DialogInterface.OnClickListener() {  
                          public void onClick(DialogInterface dialog,int id) {  
                                    txtAlertText.setText("No Thanks!");  
                     // Close the dialog  
                                    dialog.cancel();  
                         }  
                       });  
                     // create alert dialog  
                     AlertDialog alertDialog = alertDialogBuilder.create();  
                     // open dialog  
         alertDialog.show();  
              }  
             }  
        );  


From the above code, you can able to understand on how to set text and event for each button. Everything self descriptive.

Here is the complete code for alert dialog example.

Layout File:

 <RelativeLayout xmlns:android="http://schemas.android.com/apk/res/android"  
   xmlns:tools="http://schemas.android.com/tools"  
   android:layout_width="match_parent"  
   android:layout_height="match_parent" >  
   <TextView  
     android:id="@+id/txtAlertText"  
     android:layout_width="wrap_content"  
     android:layout_height="wrap_content"  
     android:layout_centerHorizontal="true"  
     android:layout_centerVertical="true"  
     android:padding="@dimen/padding_medium"  
     android:text="[Alert Text]"  
     tools:context=".AlertDialogActivity" />  
   <Button  
     android:id="@+id/btnOpenAlertDialog"  
     android:layout_width="wrap_content"  
     android:layout_height="wrap_content"  
     android:layout_above="@+id/txtAlertText"  
     android:layout_centerHorizontal="true"  
     android:layout_marginBottom="56dp"  
     android:text="Open Alert Dialog" />  
 </RelativeLayout>  


Activity Class:

 import android.os.Bundle;  
 import android.app.Activity;  
 import android.app.AlertDialog;  
 import android.content.Context;  
 import android.content.DialogInterface;  
 import android.view.Menu;  
 import android.view.View;  
 import android.view.View.OnClickListener;  
 import android.widget.Button;  
 import android.widget.TextView;  
 public class AlertDialogActivity extends Activity {  
      final Context context = this;  
      Button btnAlertDialog;  
      TextView txtAlertText;  
   @Override  
   public void onCreate(Bundle savedInstanceState) {  
     super.onCreate(savedInstanceState);  
     setContentView(R.layout.alert_dialog);  
     btnAlertDialog = (Button) findViewById(R.id.btnOpenAlertDialog);  
     txtAlertText = (TextView) findViewById(R.id.txtAlertText);  
     btnAlertDialog.setOnClickListener(new OnClickListener() {  
             public void onClick(View v) {  
                     AlertDialog.Builder alertDialogBuilder = new AlertDialog.Builder(context);  
                     // Title of Alert Dialog  
                     alertDialogBuilder.setTitle("Your Title");  
                     // Building alert dialog  
                     alertDialogBuilder  
                          .setMessage("Welcome Ayyanar!.")  
                          .setCancelable(false)   
                          .setPositiveButton("Yes",new DialogInterface.OnClickListener() {  
                          public void onClick(DialogInterface dialog,int id) {  
                                    txtAlertText.setText("OK Thanks!");  
                               }  
                           })  
                          .setNegativeButton("No",new DialogInterface.OnClickListener() {  
                          public void onClick(DialogInterface dialog,int id) {  
                                    txtAlertText.setText("No Thanks!");  
                     // Close the dialog  
                                    dialog.cancel();  
                         }  
                       });  
                     // create alert dialog  
                     AlertDialog alertDialog = alertDialogBuilder.create();  
                     // open dialog  
         alertDialog.show();  
              }  
             }  
        );  
   }  
   @Override  
   public boolean onCreateOptionsMenu(Menu menu) {  
     getMenuInflater().inflate(R.menu.alert_dialog, menu);  
     return true;  
   }  
 }  


Manifest file:

 <manifest xmlns:android="http://schemas.android.com/apk/res/android"  
   package="com.ayyanar.helloworld"  
   android:versionCode="1"  
   android:versionName="1.0" >  
   <uses-sdk  
     android:minSdkVersion="8"  
     android:targetSdkVersion="15" />  
   <application  
     android:icon="@drawable/ic_launcher"  
     android:label="@string/app_name"  
     android:theme="@style/AppTheme" >  
      <activity  
       android:name=".AlertDialogActivity"  
       android:label="@string/title_activity_alert_dialog" >  
       <intent-filter>  
         <action android:name="android.intent.action.MAIN" />  
         <category android:name="android.intent.category.LAUNCHER" />  
       </intent-filter>  
     </activity>  
   </application>  
 </manifest>  


Screenshots:


How to make a phone call in Android

In this post, I am going to discuss about on how to make a phone call in android. Just three line statements is enough to make a call in android application.

Just use the below code in button click event to make a phone call.

 Intent callIntent = new Intent(Intent.ACTION_CALL);  
 callIntent.setData(Uri.parse("tel:+919999999999"));  
 startActivity(callIntent);  


And also, you have to set permission in manifest file. Use the below code for phone call permission.

  <uses-permission android:name="android.permission.CALL_PHONE" />  


Here is the complete code for making a phone call.

Layout File:

 <RelativeLayout xmlns:android="http://schemas.android.com/apk/res/android"  
   xmlns:tools="http://schemas.android.com/tools"  
   android:layout_width="match_parent"  
   android:layout_height="match_parent" >  
   <Button  
     android:id="@+id/btnPhoneCall"  
     android:layout_width="match_parent"  
     android:layout_height="wrap_content"  
     android:layout_alignParentLeft="true"  
     android:layout_centerVertical="true"  
     android:text="Call +919999999999" />  
 </RelativeLayout>  


Activity Class:

 import android.net.Uri;  
 import android.os.Bundle;  
 import android.app.Activity;  
 import android.content.Intent;  
 import android.view.Menu;  
 import android.view.View;  
 import android.view.View.OnClickListener;  
 import android.widget.Button;  
 public class PhoneCallActivity extends Activity {  
      Button btnPhoneCall;  
   @Override  
   public void onCreate(Bundle savedInstanceState) {  
     super.onCreate(savedInstanceState);  
     setContentView(R.layout.phonecall);  
     btnPhoneCall = (Button) findViewById(R.id.btnPhoneCall);  
     btnPhoneCall.setOnClickListener(new OnClickListener() {  
             public void onClick(View v) {  
                  Intent callIntent = new Intent(Intent.ACTION_CALL);  
                  callIntent.setData(Uri.parse("tel:+919999999999"));  
                  startActivity(callIntent);  
              }  
             }  
        );  
   }  
   @Override  
   public boolean onCreateOptionsMenu(Menu menu) {  
     getMenuInflater().inflate(R.menu.phonecall, menu);  
     return true;  
   }  
 }  


Android Manifest File:

 <manifest xmlns:android="http://schemas.android.com/apk/res/android"  
   package="com.ayyanar.helloworld"  
   android:versionCode="1"  
   android:versionName="1.0" >  
   <uses-sdk  
     android:minSdkVersion="8"  
     android:targetSdkVersion="15" />  
     <uses-permission android:name="android.permission.CALL_PHONE" />  
   <application  
     android:icon="@drawable/ic_launcher"  
     android:label="@string/app_name"  
     android:theme="@style/AppTheme" >  
     <activity  
       android:name=".PhoneCallActivity"  
       android:label="@string/title_activity_phone_call" >  
       <intent-filter>  
         <action android:name="android.intent.action.MAIN" />  
         <category android:name="android.intent.category.LAUNCHER" />  
       </intent-filter>  
     </activity>  
   </application>  
 </manifest>  


Screenshots:


Wednesday, October 31, 2012

How to create simple "Hello World" application in Android 4.0

In this post, I am going to explain how to create simple "Hello World" application in Android. Before start this, i believe you have installed Eclipse and Android properly in your system.

First, you have to create a Android application project from File -> New -> Android Application Project.

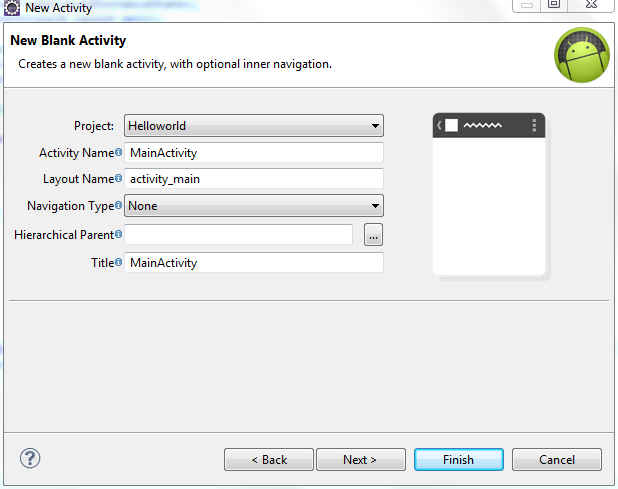
While creating a project itself, you would be asked to specify the activity and layout name like below. Once you given the name, project will be created with one new activity and layout.


Layout -- It's nothing but screen where you can put controls like textview, button, etc.
Activity -- Decides which layout should show.

In Layout file, add TextView control to show the "Hello World, Android 4.0" text while loading activity. add Button to show the "Hello World" toast message like popup.

Layout File (XML):


 <RelativeLayout xmlns:android="http://schemas.android.com/apk/res/android"  
   xmlns:tools="http://schemas.android.com/tools"  
   android:layout_width="match_parent"  
   android:layout_height="match_parent" >  
   <TextView  
     android:id="@+id/txtView1"  
     android:layout_width="wrap_content"  
     android:layout_height="wrap_content"  
     android:layout_centerHorizontal="true"  
     android:layout_centerVertical="true"  
     android:padding="@dimen/padding_medium"  
     android:text="@string/hello_world"  
     tools:context=".MainActivity" />  
   <Button  
     android:id="@+id/btnHello"  
     android:layout_width="wrap_content"  
     android:layout_height="wrap_content"  
     android:layout_alignLeft="@+id/txtView1"  
     android:layout_below="@+id/txtView1"  
     android:text="@string/button_title_hello" />  
 </RelativeLayout>  

Activity Class:


 package com.ayyanar.helloworld;  

 import android.os.Bundle;  
 import android.app.Activity;  
 import android.view.Menu;  
 import android.view.View;  
 import android.view.View.OnClickListener;  
 import android.widget.Button;  
 import android.widget.TextView;  
 import android.widget.Toast;  
 public class MainActivity extends Activity {  
      Button btnHello;  
   @Override  
   public void onCreate(Bundle savedInstanceState) {  
     super.onCreate(savedInstanceState);  
     setContentView(R.layout.main);  
     TextView text = (TextView) findViewById(R.id.txtView1);  
     btnHello = (Button) findViewById(R.id.btnHello);  
     text.setText("Hello World, Android 4.0");  
     btnHello.setOnClickListener(new OnClickListener() {  
             public void onClick(View v) {  
                  Toast.makeText(getApplicationContext(),  
                         "Hello World Ayyanar!",  
                         Toast.LENGTH_LONG).show();  
              }  
             }  
        );  
   }  
   @Override  
   public boolean onCreateOptionsMenu(Menu menu) {  
     getMenuInflater().inflate(R.menu.main, menu);  
     return true;  
   }  
 }  


if you run the above code (Right click on android project, choose "Run As" --> Android Application). You will see below screen.