ng update @angular/cli
ng update @angular/core


1: function showAlert1()
2: {
3: alert("testing combining and compression");
4: }
1: function showAlert2()
2: {
3: alert("testing combining and compression");
4: }
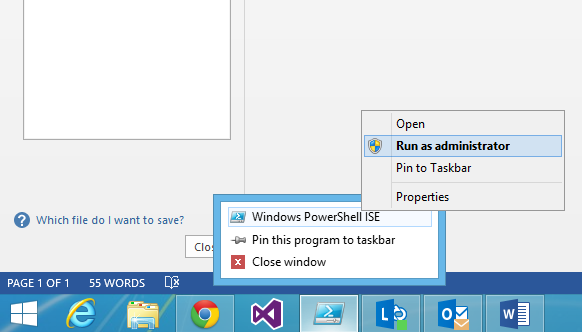
1:
2: #defining version
3: $version = "1.0";
4:
5: #creating new file. "-force" replaces new file if file already exists
6: New-Item "CustomJS-$version.js" -type file -force
7: New-Item "CustomJS-$version.min.js" -type file -force
8:
9: # Getting content from multiple custom JS files and put into a single version file.
10: # if your custom JS files and output files located in same directory, you have to exclude the output files. Otherwise you get access denied error.
11: Get-Content "Custom*.js" -Exclude "CustomJS-$version.js", "CustomJS-$version.min.js" | Add-Content "CustomJS-$version.js"
12:
13: #compressing JS files using Yahoo UI Compressor JAR file
14: java -jar yuicompressor-2.4.8pre.jar "CustomJS-$version.js" -o "CustomJS-$version.min.js"
1: function showAlert1()
2: {
3: alert("testing combining and compression");
4: }
5: function showAlert2()
6: {
7: alert("testing combining and compression");
8: }
1: function showAlert1(){alert("testing combining and compression")}function showAlert2(){alert("testing combining and compression")};
1: #defining version
2: $version = "1.0";
3:
4: #creating new file. "-force" replaces new file if file already exists
5: New-Item "CustomCSS-$version.css" -type file -force
6: New-Item "CustomCSS-$version.min.css" -type file -force
7:
8: # Getting content from multiple custom CSS files and put into a single version file.
9: # if your custom CSS files and output files located in same directory, you have to exclude the output files. Otherwise you get access denied error.
10: Get-Content "Custom*.css" -Exclude "CustomCSS-$version.css", "CustomCSS-$version.min.css" | Add-Content "CustomCSS-$version.css"
11:
12: #compressing CSS files using Yahoo UI Compressor JAR file
13: java -jar ..\JAR\yuicompressor-2.4.8pre.jar "CustomCSS-$version.css" -o "CustomCSS-$version.min.css"
a) $("#content").off();   // unbind all the events of that control.
b) $("#content").empty(); or   $("#content").html("");  // -- Remove the child elements before removing the element itself.
c) $("#content").remove();  // -- remove the element itself.
delete x;  // x is variable
x = null;
[object].sortable = null;
   <div>
     <a id="atest" style="cursor:pointer" onclick="showAlert1();"> Click to fire an event</a>
   </div>
  <script type="text/javascript">
     $(function () {
       $("#atest").attr("onclick", "showAlert1();showAlert2();");
     });
     function showAlert1()
     {
       alert("Alert 1");
     }
     function showAlert2() {
       alert("Alert 2");
     }
   </script>
Above jQuery, replacing the onclick attribute to show the two alert instead of single alert. This code won't work in IE 7/8 browser. To fix this, you can bind a custom click event using click method in jQuery.
  <script type="text/javascript">
     $(function () {
       $("#atest").click(function () { showAlert1(); showAlert2(); });
     });
     function showAlert1()
     {
       alert("Alert 1");
     }
     function showAlert2() {
       alert("Alert 2");
     }
   </script>
  <script type="text/javascript">
     $(function () {
       var onc = $("#atest").attr("onclick");
       var elemHTML = $("#atest").parent().html();
       var finalElement = elemHTML.replace(onc, onc + "showAlert2();");
       $("#atest").parent().html(finalElement);
     });
     function showAlert1()
     {
       alert("Alert 1");
     }
     function showAlert2() {
       alert("Alert 2");
     }
   </script>


